General configuration
Following is a complete tutorial on how to build from scratch an android application using JNI, OpenCV and OpenCL under Linux.
Before starting developing make sure the system requirements and configuration are set.
- Android development environment – Android SDK, NDK and Eclipse.
- Easiest is to install nVidia’s Tegra Android Development Pack (TADP)
- Android based mobile device that supports:
– OpenCL
– Install and configure OpenCV
Next step is to make sure the mobile device is connected correctly to the linux machine.
- Connect the device to the linux machine using a USB cable.
- Run the adb devices -l command from a shell window. The result should look similar to this:
eyal@TP-W520-lin:~/work/MobileTemplate/Tutorial$ adb devices -l
List of devices attached
4d00ac01d42c30dd unauthorized usb:3-2
Create the initial android application using Eclipse
- Choose “File | New | Android Application Project”
- In “Application name” put SagivTechTemplate
- Change the SDK configuration and other GUI options to the desired configuration
- In “Activity name” put SagivTechMainActivity
This is the bare minimum Android application that can already be compiled and deployed to the target device.
Next is to add C++ support (Native) to the application so it can call C++ code for faster execution, OpenCL code etc.
- Choose “File | New | Other”
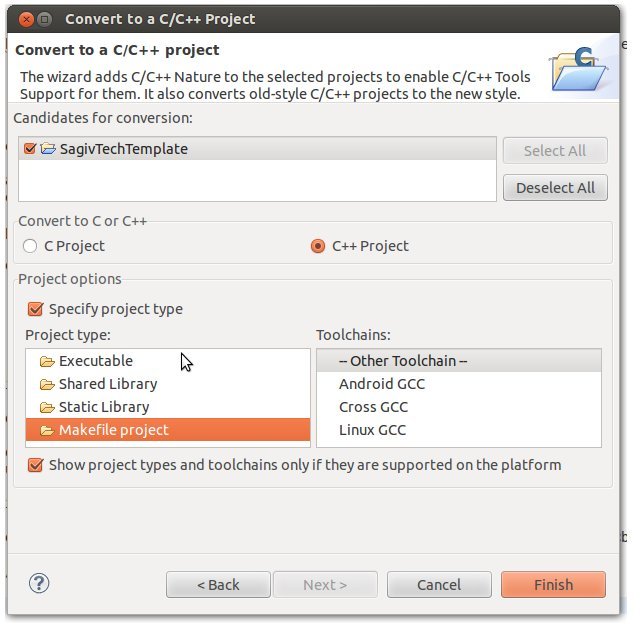
- Choose “Convert to a C/C++ Project (Adds C/C++ Nature)”
- Select as shown in the image

- Click Yes when asked if to open a C++ prespective
- In the Project Explorer pane, select SagivTechTemplate, right click and select Properties
- Select “C/C++ Build | Builder Settings”
- Uncheck the “Use default build command”
- Put ndk-build in the “Build command” text box
- In “Behaviour” clear the text box next to the “Build (Incremental build)” checkbox
- Uncheck the “Clean” checkbox
- Under “C/C++ General” select “Paths and Symbols”
- Add the following include paths to the “GNU C++” section in the “Includes” tab
– ${NDKROOT}/platforms/android-14/arch-arm/usr/include
– ${NDKROOT}/sources/cxx-stl/gnu-libstdc++/4.6/include
– ${NDKROOT}/sources/cxx-stl/gnu-libstdc++/4.6/libs/armeabi-v7a/include
* Note that the android architecture, arm/cpu type might be different for you, so those parameters should be adjusted appropriatly.
In order to complete the native support configuration, and for the project to compile, add a skeleton .cpp file and any other relevant already existing .cpp files.
- In the Project Explorer pane, select SagivTechTemplate, right click and select New | Folder
- Name the new folder jni
- Add a new file named Application.mk under the jni folder, and set it to (omit the line numbers):

- Add a new file named Android.mk under the jni folder, and set it to:

- Right click on the jni folder and select “New | File”, put in SagivTechImpl.cpp as the name of the new file
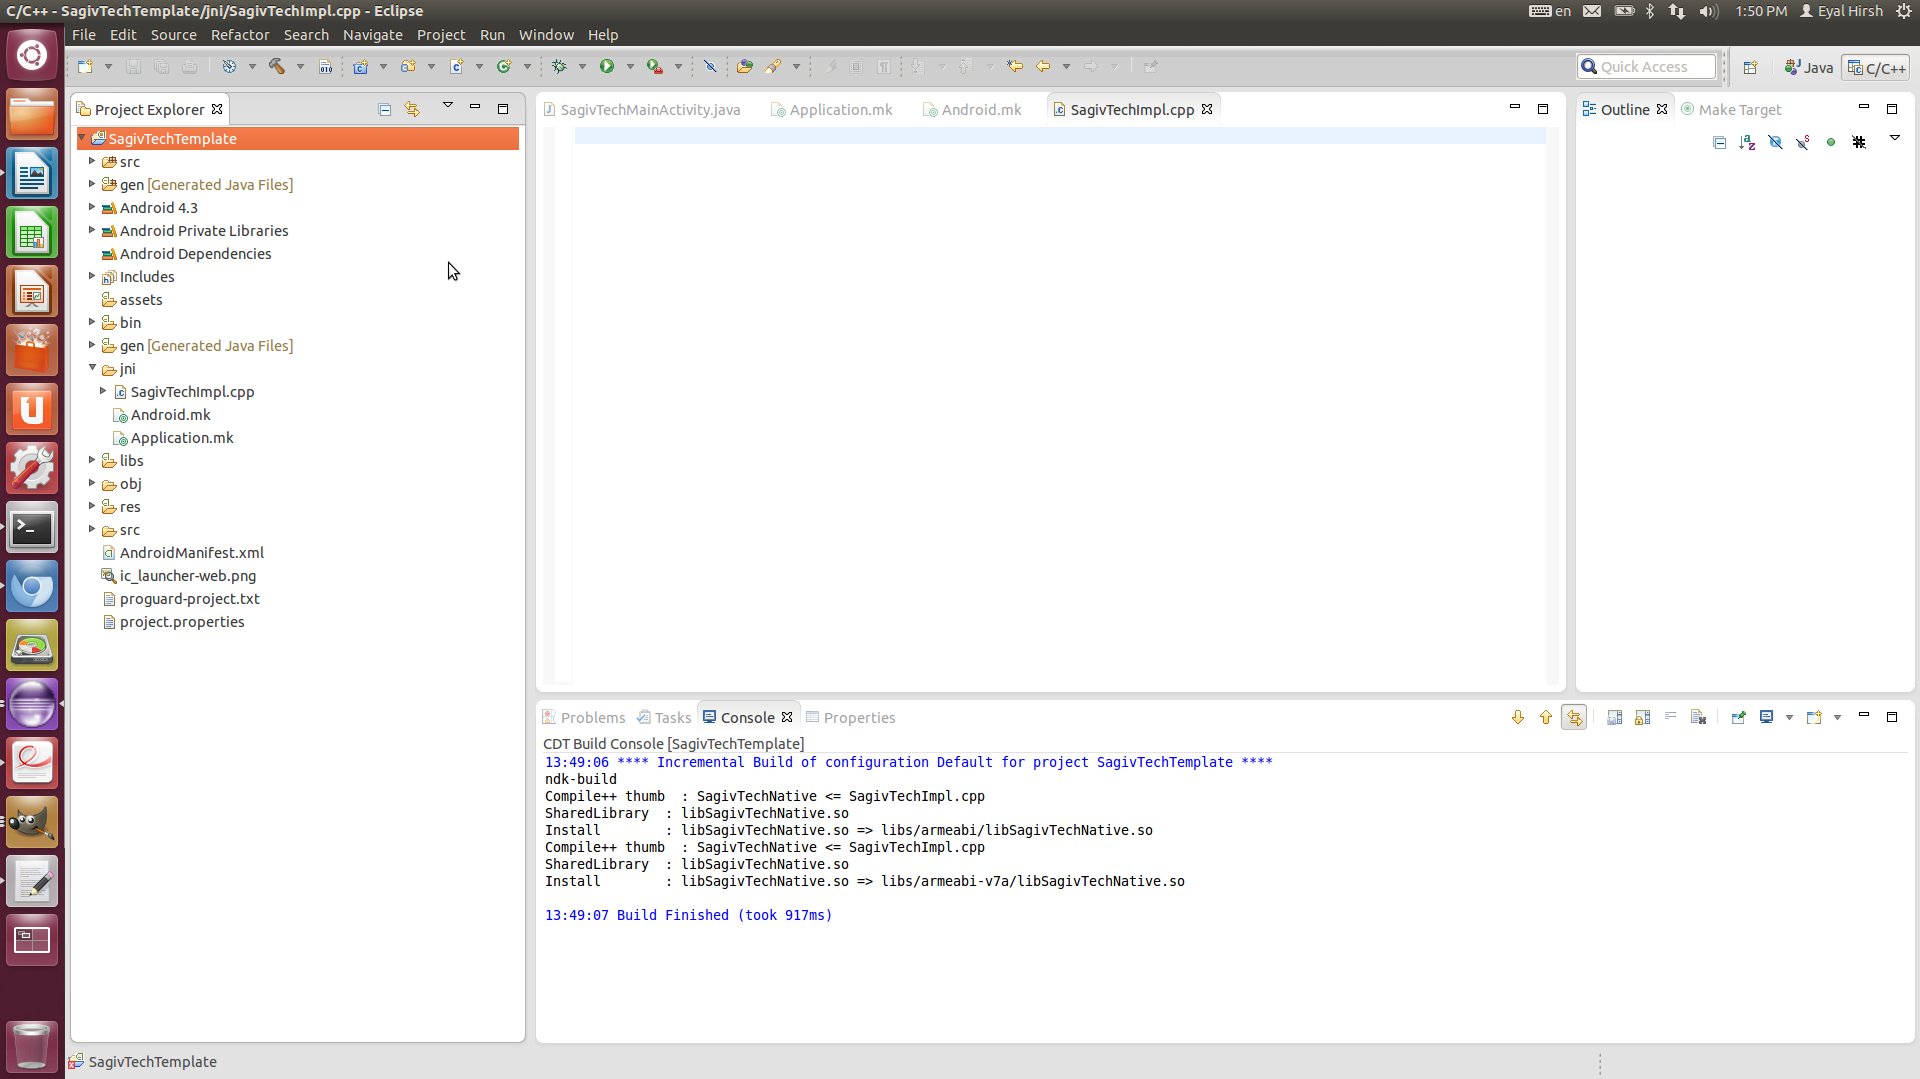
The android application should be now ready for compilation. Compile the application and verify it all compiled correctly. The eclipse project should look similar to that:

As can be seen in the Console tag in the image above, the SagivTechImpl.cpp code, which is currently empty, was compiled by the NDK compiler and alibSagivTechNative.so has been created. his library will be packed with the Android application as an .apk file and can already be installed on the device.
OpenCV on Android
Next, add OpenCV support for the android application.
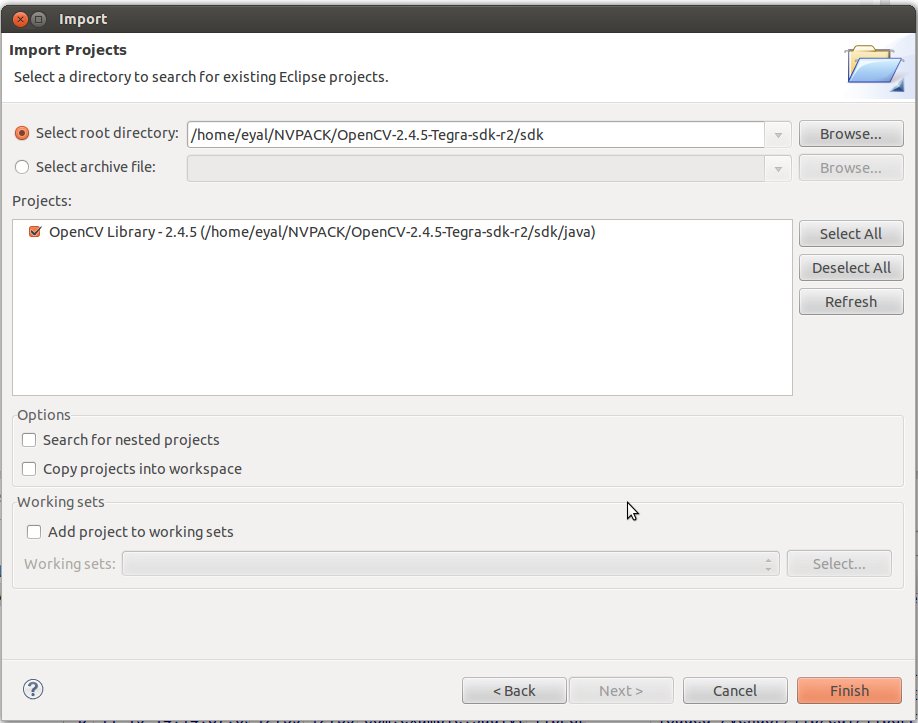
- From the menu, select “
File | Import” and then “General | Existing Projects into Workspace" - Select the sdk folder from where OpenCV has been installed on the local machine

- Click finish and the OpenCV project should be added to the Project Explorer pane
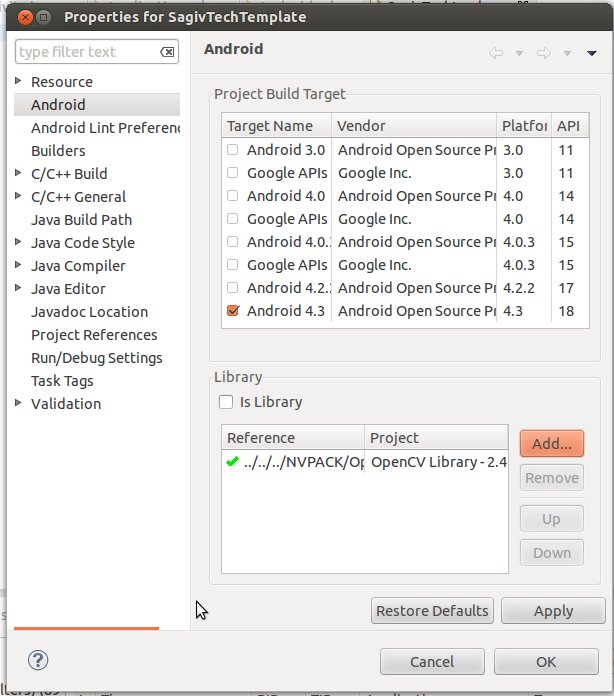
- Right click “SagivTechTemplate” in the Project Explorer pane, select Properties followed by Android
- In the Library box, click the Add button and select the OpenCV reference there

- Back in Android.mk uncomment lines 5 to 9 to enable OpenCV in the android application
Once OpenCV is configured both on the device and in the eclipse project, we can test that it all works fine by calling a native C++ function, that will get the current frame from the camera, convert it to gray scale and show it in the android application GUI.
- Add the following lines of code to the AndroidManifest.xml file

- Update the res/layout/activity_sagiv_tech_main.xml as shown here
- Create new class named SagivTechProcessingThread using the code here
- This class will run in a different thread, receive the camera frame data and process it either with OpenCV or OpenCL, both using Native C++ code
- Update the SagivTechMainActivity.java as shown here
- Update the SagivTechImpl.cpp as shown here
The android application is ready to be run now. Clicking the OpenCV button converts the camera frame from BGRA to Gray level.
Below is a movie showing the OpenCV BGRA to Gray operation on live data as captured by the device’s camera.
OpenCL on Android
For compute oriented tasks, OpenCL on the device can be used. Following are the steps required to enable OpenCL on the device.
- Download the relevant OpenCL binaries from the device to the local machine in order for the link to pass correctly
For Imagination PowerVR support, use:

For Qualcomm, use:
- Relevant OpenCL binaries should be placed in the correct folder in the local folder. Note that the right android-XX folder (under the ${NDK_ROOT}/platforms/), where the OpenCL library should be placed, is determined by the value of the APP_PLATFORM parameter specified in the Application.mk file. For example, if the APP_PLATFORM value is 11, and there are android-9 and android-14 folders
under the ${NDK_ROOT}/platforms/ folder, the OpenCL library should be placed under the ${NDK_ROOT}/platforms/android-9/arch-arm/usr/lib folder.
In case the APP_PLATFORM value is 14, the OpenCL library should be placed under in the ${NDK_ROOT}/platforms/android-14/arch-arm/usr/lib folder. - Copy current OpenCL header files directly under the jni folder
- In the LOCAL_LDLIBS variable in Android.mk add -lPVROCL for OpenCL on Imagination platform and -lOpenCL on Qualcomm
- Add the #include <CL/cl.h> to SagivTechImpl.cpp and verify the code compiles and runs correctly. Nothing done in OpenCL yet, but it should compile fine
- Add the SagivTechTemplateSample.cl file under the asset folder. This file will contain the OpenCL kernel code
- <SagivTechImpl.cpp, SagivTechProcessingThread.java and SagivTechMainActivity.java has been updated with OpenCL related code
OpenCL demo is ready to be run. By clicking the OpenCL button, the kernelSagivTechSample will run on the device’s GPU for every frame, masking out the frame to contain only the green color.
Below is a movie showing the OpenCL on live data as captured by the device’s camera.
Boost on Android
Adding boost to android requires a few steps:
- Download the Boost-for-android-patch from here
- Extract the zip file and run the build-android.sh $(NDKROOT) script located under the Boost-for-Android-master folder
- The script will download Boost_1.53, configure and install it under the Boost-for-Android-master/build folder
- Move the include and lib folders from the build folder to $(NDKROOT)/sources/android/boost
- Make sure the lib files have been generated under the lib folder
- Add the following lines to the Android.mk file:

- Boost is ready to be used in the native C++ code, add the boost include directives and code, compile and run
This project is partially funded by the European Union under thw 7th Research Framework, programme FET-Open SME, Grant agreement no. 309169

Written by: Eyal Hirsch, GPU Computing Expert, Mobile GPU Leader, SagivTech.
Legal Disclaimer:
You understand that when using the Site you may be exposed to content from a variety of sources, and that SagivTech is not responsible for the accuracy, usefulness, safety or intellectual property rights of, or relating to, such content and that such content does not express SagivTech’s opinion or endorsement of any subject matter and should not be relied upon as such. SagivTech and its affiliates accept no responsibility for any consequences whatsoever arising from use of such content. You acknowledge that any use of the content is at your own risk.
